Elastic Connector How to
Note
This documentation suits only for Bring Your Own SIEM (BYOS) customers.
If you are an Elastic By Nybble customer, all configurations are already done.
Overview
By following this page, you will setup the connection between your SIEM and Nybble Hub.
It consists of an endpoint on Hub side, a webhook connector and SSO on Elastic side.
Note
Starting at release 2024.06.01, the SSO can be optional. However, it drastically restrict analysis and decision capabilities of our Nybblers.
To disable SSO, skip chapter Nybble SSO.
Hub side: connector
- Connect to Nybble Hub using your usual credentials
- Go to Settings > Connectors
-
Add an Elastic connector then fill the form:
Field Explanation Usual value Display Name name to display during authentication and in hub configs elasticKibana URL root URL of Kibana, will be used to forge all URLs to access your SIEM from Hub https://contoso.kb.northeurope.azure.elastic-cloud.com:9243 -
Click on Save
Warning
At this stage, connector password will be generated and available in a popup.
Be sure to copy and store this password in a secure location as it will not be displayed anymore !
You can always reset it afterwards, but you will have to update any webhooks with the new value.
Elastic side: webhook connector
Note
This step requires admin rights on Elastic side
- Go to Stack Management -> Alerts and Insights -> Connectors and click on
Create Connector - Select the
Webhooktype -
Fill the fields:
Field Explanation Usual value Connector Name display name nybbleConnector Settings / Method - POST Connector Settings / URL URL of central nybble connectors endpoint https://connectors.nybble-analytics.io/conn/elasticAuthentication / Username,Password connector authentication values from Hub side: connectorAuthentication / HTTP Header additional infos, required key: Content-Type
Value:application/json -
Click on save.
The final steps will be to use this connector on any security rule actions, in order to send raised alerts to Nybble services.
Usually this step is done with Nybble Professional Services according to detection perimeter.
Nybble SSO
Nybble analysts and hunters requires an access to your SIEM in order to complete their investigations.
This access is limited:
- dedicated space, with access to specific features, with its specific dataview
- restricted role, where you can restrict indexes
On top, we're connecting our SSO solution to your cluster, avoiding account management on your side. Our SSO is MFA enabled and restricted to the specific space.
Nybble dedicated space
POST kbn:/api/spaces/space
{
  "id": "nybble",
  "name": "Nybble",
  "description": "Dedicated space for Nybble detection rules, analysts and hunters.",
  "initials": "",
  "color": "#FFFFFF",
  "disabledFeatures": [
    "maps",
    "enterpriseSearch",
    "dev_tools",
    "advancedSettings",
    "indexPatterns",
    "filesManagement",
    "filesSharedImage",
    "savedObjectsManagement",
    "savedObjectsTagging",
    "osquery",
    "actions",
    "generalCases",
    "guidedOnboardingFeature",
    "rulesSettings",
    "maintenanceWindow",
    "stackAlerts",
    "fleetv2",
    "fleet",
    "monitoring",
    "siem",
    "securitySolutionCases",
    "logs",
    "infrastructure",
    "apm",
    "uptime",
    "observabilityCases",
    "slo",
    "dashboard",
    "ml",
    "graph",
    "visualize",
    "canvas"
  ],
  "imageUrl": "data:image/png;base64,iVBORw0KGgoAAAANSUhEUgAAAEAAAABACAYAAACqaXHeAAAAAXNSR0IArs4c6QAABFFJREFUeF7tW9tx3DAMJN1BnIJyV43dRewu7GpyKSh2B6cMRUknUwCxeEieTHxfmQxFAoslsIDknI76Pb6f0jD8go57vc/QuoBFhx2UHt6K8yfI5jw8p5fvT9Ba56JjANBEf3boIBCOAUAT/VtEL+n1/uwMsPj4/gBYon8gC/YH4OFtEMPQW7BzQtwXgMc/T2nIP10A7JwL9gPAQ/0WsR1ZgANQojn+7i7p5dtFjGpE9JdckM/Yme9Tmb2e0DKKAcA7c0l5+L2A0dZu7/2fN14zoDBr/F1Pacg/piWUvoCqiAyALpIfD9U9S5MqN9HXlFQgf/QBsNzj1mAfCNsoalnV2tPA3AdAe1jdPI4FUWB2kigPgCdy7YG2vfzRB1QlDYDN4NtxFO20bIqKvqAqtwB4naeuQfk/zb5U8tI8z9VoYt8tAJosq5Wwde/+r5RVqhXWMog6BQLAkvnJw0DxIgGiZU9vPwiAskEMCyAhgvgfZE9KRDWgk2AEAIAIgZyPYgBjD1MFFPM78K7BznILvUmQEUS8DrCzII76LRg72NQRQkYWCNLTxQRrgu5cx1gp3Lv31XhsOMKVwjEfGAJjksLaaiAlPW0d7w1BNPlAsAtoh0v/fa39du2/t7235LzGYEG6LleIzwd1WDPOKe7qvzsDHBkANiuD0xcLZeczpVHYOKWSnexqI1dSQh62Z+4Sxd3fEPXb4ZE+jldUnuijV6EXhPX4jPEDb4dLNNCB6GyUJ/o3x3S6Yna6VpxbvoKVIJKwEDCQfZArVBNa/yqMTi9DUv4FrNgMWYzmEpW27Elg8Ofgb50JMG9XwOL8uCHR9kbc/RaQyHNWTKgAWJ3nANCKKCn67aB1Xu+yu16r7HK+GkInKY9xSPS9gZuuQw4YNvBZOgYEfv+AKhMBADlpWYLoTYa97tK99/CcTd0VSlEvTeXuUh6ydnVwGABCnbZGKqoj5EDI+VyrgNVAVK1ZcoE0WAm4/2VIOgOgExMUokjnhn8tIsvfoKDFACBJ1TEXrOYKYt0HPsKwsGp97mTzJIQMY6Z5M8R50WHjAg8IIQB8pvNeNThdWXsvcLTz5Qpxoy09E5YcQ78dLuj2EhaXoddNUBRAt2lybXO5fWUQLinn5xZE4ROZ6cuwNRic81xZsgLROk4ksE3m2HahpNMftoLTzzyAbGmItr4oED3HNwqUEGDzRAj5lK8QCgaAWijTbvsUS+HlxQn2SX1QFbIBoIkSjTD1/Y9HjIlUZ9WwiQF+GRoNQHFDVo+EszYGfAGg+PMXjmJt7xCk7bWM/iwGbIcoXgDQKtMgZAPAkv3b0EQz4J8DYC2oUC3R4/exADi6x6V+r94nhABg+yzPeAW+AMD/CpRVICsZ+58xgFZt3sQqjeSYQNiugHUYgSQqLRDInp3k6QNAA4Q05V0biYDgdHzJxVrl1F1PG27S6OM51H5Bju8DQMsITdQ5ZGcQgh2fj/sLWPgS2KwcngcAAAAASUVORK5CYII="
}
Elastic configuration
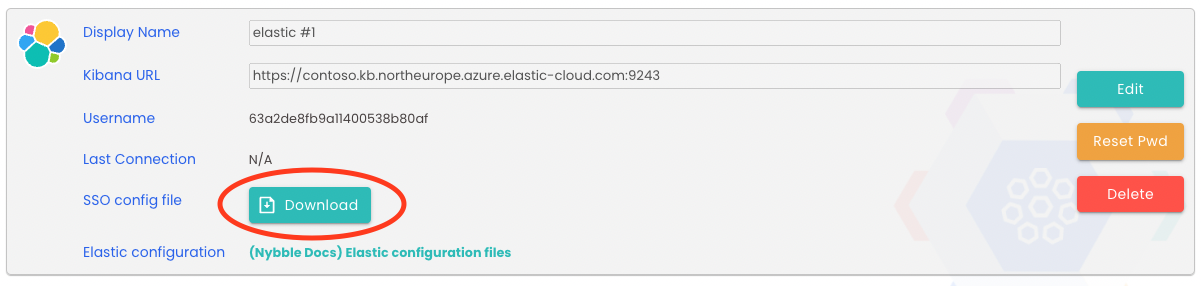
- From the Hub, grab the elastic SSO yaml file available in the connectors section (Admin -> connectors):
- Import the yaml file in your Elastic organization (cloud):
Deployments ->deployment name-> edit -> elasticsearch -> manage user settings and extensions
Kibana configuration
Import this yaml file in your Elastic organization, kibana settings:
xpack.security.authc.providers:
  saml.nybble:
    order: 0
    realm: nybble
    description: "Log in with Nybble Auth"
    hint: "Nybble Hunters and Analysts"
    icon: "data:image/svg+xml;base64,PHN2ZyBpZD0iTGF5ZXJfMSIgZGF0YS1uYW1lPSJMYXllciAxIiB4bWxucz0iaHR0cDovL3d3dy53My5vcmcvMjAwMC9zdmciIHZpZXdCb3g9IjAgMCAzNjguOCA0MzQiPjxwYXRoIGQ9Ik0xNjAuMiwxMjMuOWwtMjguNiw0OC42LDI4LjYsNDguNmg1Ny4zbDI4LjYtNDguNi0yOC42LTQ4LjdaIiBzdHlsZT0iZmlsbDojMDA2N2VlIi8+PHBhdGggZD0iTTE2Mi43LDAsMTM2LjQsNDQuNmwyNi4zLDQ0LjdoNTIuNWwyNi4zLTQ0LjZMMjE1LjEsMFoiIHN0eWxlPSJmaWxsOiMwMDY3ZWUiLz48cGF0aCBkPSJNMzYuOSw4NS45bDE4LjUsNDguMyw1MS4yLDcuMywzMi43LTQxLjFMMTIwLjgsNTIuMSw2OS42LDQ0LjhaIiBzdHlsZT0iZmlsbDojMDA2N2VlIi8+PHBhdGggZD0iTTI1LjYsMjM3LjhsNDkuMywxNS43LDM3LjYtMzUuNi0xMS42LTUxLjJMNTEuNSwxNTEsMTMuOCwxODYuNVoiIHN0eWxlPSJmaWxsOiMwMDY3ZWUiLz48cGF0aCBkPSJNMTM3LjIsMzQxLjNsNDMtMjguOC00LjMtNTEuNi00Ny4zLTIyLjgtNDMsMjguOCw0LjMsNTEuNVoiIHN0eWxlPSJmaWxsOiMwMDY3ZWUiLz48cGF0aCBkPSJNMjg3LjcsMzE4LjYsMjkyLDI2N2wtNDMtMjguOC00Ny4zLDIyLjctNC4zLDUxLjUsNDMsMjguOFoiIHN0eWxlPSJmaWxsOiMwMDY3ZWUiLz48cGF0aCBkPSJNMzYzLjksMTg2LjZsLTM3LjUtMzUuNEwyNzcsMTY2LjksMjY1LjMsMjE4bDM3LjYsMzUuNkwzNTIuMiwyMzhaIiBzdHlsZT0iZmlsbDojMDA2N2VlIi8+PHBhdGggZD0iTTMwOC4zLDQ1bC01MS4yLDcuMi0xOC42LDQ4LjMsMzIuNyw0MS4xLDUxLjMtNy4yTDM0MSw4Ni4xWiIgc3R5bGU9ImZpbGw6IzAwNjdlZSIvPjxwYXRoIGQ9Ik0wLDM2OC4zSDE0LjlMMzcsNDAzLjFWMzY4LjRINTMuN1Y0MzRIMzlMMTYuNywzOTkuNFY0MzRIMFoiIHN0eWxlPSJmaWxsOiM0ODQyNDIiLz48cGF0aCBkPSJNODguNiw0MTEuOSw2Ni4zLDM2OC40SDg0bDEzLjEsMjYuM2MyLjktNS44LDYuNy0xNCwxMy4yLTI2LjNoMTcuM2wtMjIuMiw0My41VjQzNEg4OC42WiIgc3R5bGU9ImZpbGw6IzQ4NDI0MiIvPjxwYXRoIGQ9Ik0xMzguMywzNjguM2gyNC44YzE5LjUsMCwyNC4yLDEwLjksMjQuMiwxOS43YTE3LjU0NiwxNy41NDYsMCwwLDEtNC4xLDExLjIsMTguMywxOC4zLDAsMCwxLDguNCwxNC44YzAsOC45LTMuOCwxOS45LTI4LjQsMTkuOUgxMzguNFYzNjguM1ptMTYuOSwyNmg2LjljNy4zLDAsOC42LTMuOCw4LjYtNi4ycy0uNi02LjUtNy41LTYuNWgtOFptMCwyNi41aDcuOWMxMC4zLS4yLDExLjctMy4xLDExLjctNi43cy0yLjMtNi44LTEyLjctNi44aC02LjlaIiBzdHlsZT0iZmlsbDojNDg0MjQyIi8+PHBhdGggZD0iTTIwNC4yLDM2OC4zSDIyOWMxOS41LDAsMjQuMiwxMC45LDI0LjIsMTkuN2ExNy41NDYsMTcuNTQ2LDAsMCwxLTQuMSwxMS4yLDE4LjMsMTguMywwLDAsMSw4LjQsMTQuOGMwLDguOS0zLjgsMTkuOS0yOC40LDE5LjlIMjA0LjNWMzY4LjNabTE2LjgsMjZoNi45YzcuMywwLDguNi0zLjgsOC42LTYuMnMtLjYtNi41LTcuNS02LjVoLThabTAsMjYuNWg3LjljMTAuMy0uMiwxMS43LTMuMSwxMS43LTYuN3MtMi4zLTYuOC0xMi43LTYuOEgyMjFaIiBzdHlsZT0iZmlsbDojNDg0MjQyIi8+PHBhdGggZD0iTTI3MCwzNjguM2gxNi43djUyLjJoMjUuMVY0MzRIMjcwWiIgc3R5bGU9ImZpbGw6IzQ4NDI0MiIvPjxwYXRoIGQ9Ik0zMjUuNiwzNjguM2g0Mi41djEzLjJIMzQyLjR2MTMuN2gyMS41djEzLjJIMzQyLjR2MTIuM2gyNi40VjQzNEgzMjUuNlYzNjguM1oiIHN0eWxlPSJmaWxsOiM0ODQyNDIiLz48L3N2Zz4="
Nybble role
Use the elastic dev console to import the nybble_analyst_hunter role:
POST _security/role/nybble_analyst_hunter
{
    "cluster": [],
    "indices": [
      {
        "names": [
          "logs-*"
        ],
        "privileges": [
          "read",
          "read_cross_cluster",
          "view_index_metadata"
        ],
        "field_security": {
          "grant": [
            "*"
          ],
          "except": []
        },
        "allow_restricted_indices": false
      },
      {
        "names": [
          ".*-nybble"
        ],
        "privileges": [
          "write",
          "read",
          "view_index_metadata",
          "maintenance",
          "manage"
        ],
        "field_security": {
          "grant": [
            "*"
          ]
        },
        "allow_restricted_indices": false
      }
    ],
    "applications": [
      {
        "application": "kibana-.kibana",
        "privileges": [
          "feature_discover.all",
          "feature_dashboard.all",
          "feature_canvas.all",
          "feature_maps.all",
          "feature_graph.all",
          "feature_visualize.all"
        ],
        "resources": [
          "space:nybble"
        ]
      }
    ],
    "run_as": [],
    "metadata": {},
    "transient_metadata": {
      "enabled": true
    }
  }
Nybble rolemapping
Use the elastic dev console to import the nybble_analyst_hunter_role_mapping role mapping:
POST _security/role_mapping/nybble_analyst_hunter_role_mapping
{
    "enabled": true,
    "roles": [
      "nybble_analyst_hunter"
    ],
    "rules": {
      "all": [
        {
          "field": {
            "realm.name": "nybble"
          }
        },
        {
          "field": {
            "groups": "*"
          }
        }
      ]
    },
    "metadata": {}
  }
Dataview
A dataview is required to let analysts searching and displaying datas from indexes (allowed through role).
Space and roles are too restricted to allow analysts creating this dataview by themselves. You have to create the according dataview in another space then moving it to Nybble's dedicated space.